Introduction and Quick Summary
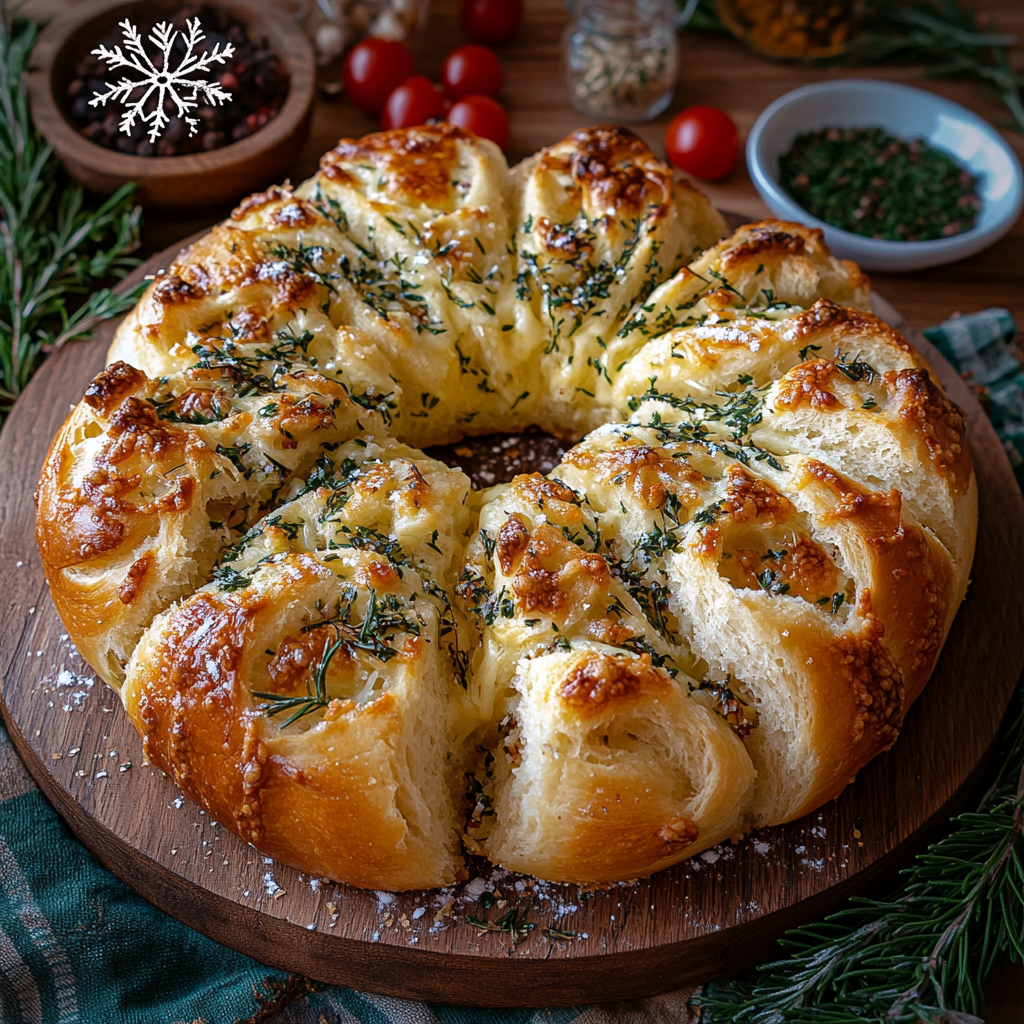
Have you ever tasted a loaf of bread so soft and cheesy that it made your taste buds dance? If not, then it’s time to introduce you to Snowflake Cheese Bread. This delightful creation is known for its airy texture and rich flavors that come together in perfect harmony. Imagine pulling apart fluffy pieces of bread filled with melted cheese; the aroma fills your kitchen and invites everyone to the table.

Jump to:
- Introduction and Quick Summary
- Why You’ll Love This Snowflake Cheese Bread
- Ingredients for Snowflake Cheese Bread
- How to Make Snowflake Cheese Bread
- Tips and Tricks
- Mistakes to avoid
- Serving Suggestions for Snowflake Cheese Bread
- FAQs about Snowflake Cheese Bread
- What makes Snowflake Cheese Bread unique?
- Can I freeze Snowflake Cheese Bread?
- What types of cheese can I use in Snowflake Cheese Bread?
- How can I enhance the flavor of my Snowflake Cheese Bread?
- Conclusion for Snowflake Cheese Bread
- 📖 Recipe Card
Every bite transports you to a world where comfort food reigns supreme. This bread is not just a treat for your palate; it’s also an ideal companion for gatherings, picnics, or cozy family dinners. Whether served as an appetizer or paired with your favorite soup or salad, Snowflake Cheese Bread shines in every setting. The best part? Its preparation is simple enough for novice bakers yet impressive enough for seasoned chefs. Get ready to experience a flavor explosion with each bite.
Why You’ll Love This Snowflake Cheese Bread
- Irresistible Fluffiness: The unique method used in this recipe yields a remarkably airy texture that melts in your mouth.
- Cheesy Goodness: With layers of gooey cheese throughout, this bread satisfies every cheese lover’s craving.
- Versatile Serving Options: Enjoy it warm as a snack, as part of a meal, or even at parties—this bread steals the show.
- Simple Preparation: With straightforward steps and minimal ingredients, making this delicious dish is a breeze.

Ingredients for Snowflake Cheese Bread
Here’s what you’ll need to make this delicious dish:
- All-Purpose Flour: Essential for creating the structure of the bread; choose unbleached flour for better flavor.
- Warm Water: Activates the yeast and helps create that fluffy texture; ensure it’s around 110°F (43°C).
- Active Dry Yeast: The leavening agent that makes the dough rise; check expiration date for best results.
- Sugar: A small amount enhances the yeast’s activity and adds subtle sweetness to the dough.
- Salt: Balances flavors and strengthens gluten structure; don’t skip this ingredient.
- Shredded Cheese: Use your favorite melting cheese like mozzarella or cheddar for maximum flavor.
The full ingredients list, including measurements, is provided in the recipe card directly below.
How to Make Snowflake Cheese Bread
Follow these simple steps to prepare this delicious dish:
Step 1: Prepare the Dough
In a mixing bowl, combine warm water and sugar. Sprinkle active dry yeast over the top and let it sit until foamy (about 5-10 minutes). In another bowl, mix all-purpose flour and salt.
Step 2: Combine Ingredients
Once the yeast mixture is foamy, add it to the flour mixture. Stir until a rough dough forms. Knead on a floured surface for about 8-10 minutes until smooth.
Step 3: First Rise
Place the dough in an oiled bowl and cover with plastic wrap or a damp cloth. Let it rise in a warm place until doubled in size (about an hour).
Step 4: Shape the Loaf
Once risen, punch down the dough to release air. Divide into small pieces and flatten each one slightly before adding shredded cheese. Roll each piece into balls.
Step 5: Second Rise
Arrange the dough balls in a greased baking dish. Cover again and let them rise until puffed (around another hour).
Step 6: Bake
Preheat your oven to 375°F (190°C). Bake for approximately 25-30 minutes until golden brown on top. Transfer to wire rack to cool slightly before serving.
Transfer to plates and enjoy warm for maximum flavor.

Tips and Tricks
Here are some helpful tips to ensure the best results for your dish:
- Use Fresh Yeast: Make sure your yeast is fresh for optimal rising; expired yeast won’t work effectively.
- Knead Properly: Kneading develops gluten; don’t rush this step as it affects texture.
- Experiment with Cheeses: Feel free to mix different cheeses like gouda or pepper jack for unique flavors.
Mistakes to avoid
- Using Old Ingredients: Always ensure your ingredients are fresh. Expired or stale cheese can compromise the flavor and texture of your Snowflake Cheese Bread. Check the expiration dates on all dairy products, especially the cheese, as it is a key element in this recipe. Fresh ingredients not only enhance taste but also contribute to the overall rise and fluffiness of your bread.
- Not Measuring Properly: Accurate measurements are crucial when making Snowflake Cheese Bread. Using too much flour can lead to a dense loaf, while too little can result in a mixture that’s too wet. Invest in a good kitchen scale for precise measurements, or use measuring cups correctly by leveling off the top of dry ingredients instead of scooping them directly from the bag.
- Skipping the Kneading Process: Kneading develops gluten, which gives structure to your Snowflake Cheese Bread. Skipping this step may yield a flat and unappealing loaf. Make sure to knead the dough for at least 10 minutes until it’s smooth and elastic. This will help create those delightful fluffy layers that make this bread so special.
Serving Suggestions for Snowflake Cheese Bread
This Snowflake Cheese Bread is versatile and pairs wonderfully with:
- A warm bowl of soup: This delightful bread complements a variety of soups—try it with tomato basil or creamy potato leek for a comforting meal.
- Fresh salads: Serve slices alongside a crisp green salad with a tangy vinaigrette. The cheese flavor enhances the freshness of the greens.
- Charcuterie boards: Incorporate Snowflake Cheese Bread into your next charcuterie spread. It adds texture and flavor that will elevate your board’s appeal.

FAQs about Snowflake Cheese Bread
What makes Snowflake Cheese Bread unique?
Snowflake Cheese Bread stands out due to its light, fluffy texture and rich cheesy flavor. The bread gets its name from its airy, snow-like appearance when baked. Unlike traditional cheese breads, which may be dense, this recipe ensures that every bite is soft and delightful. It also allows for various cheese combinations; using different cheeses can create unique flavors. Whether you opt for sharp cheddar or creamy mozzarella, you’ll have a tasty treat that’s perfect for any occasion.
Can I freeze Snowflake Cheese Bread?
Yes, you can freeze Snowflake Cheese Bread. After baking, allow the bread to cool completely. Wrap it tightly in plastic wrap or aluminum foil to prevent freezer burn, then place it in an airtight container or freezer bag. When you’re ready to enjoy it again, simply thaw it at room temperature or reheat it in the oven until warm. Freezing doesn’t significantly affect the texture or flavor, making this an excellent option for meal prep or future gatherings.
What types of cheese can I use in Snowflake Cheese Bread?
You can experiment with various cheeses when making Snowflake Cheese Bread. Popular choices include cheddar for a sharp taste, mozzarella for creaminess, and gouda for smokiness. Mixing different cheeses can create an exciting flavor profile—try combining parmesan with fontina for a gourmet twist. Just remember to shred your cheese finely so that it integrates well into the dough and melts beautifully during baking.
How can I enhance the flavor of my Snowflake Cheese Bread?
To elevate the flavor of your Snowflake Cheese Bread, consider adding herbs and spices into the dough. Fresh herbs like rosemary or thyme can add depth, while garlic powder gives it an enticing aroma. For added texture and crunch, sprinkle sesame seeds or poppy seeds on top before baking. A brush of melted butter infused with herbs right after baking will make it shine and add extra richness to your bread.
Conclusion for Snowflake Cheese Bread
In summary, Snowflake Cheese Bread is a delightful addition to any meal. Its light texture and rich flavors make it perfect for pairing with soups, salads, or as part of a charcuterie board. The versatility in cheese options allows you to customize this recipe to suit your taste preferences. Additionally, freezing leftovers ensures you always have some on hand for future cravings. With simple ingredients and easy preparation methods, this recipe is not only delicious but also accessible for home bakers looking to impress their guests or enjoy a cozy night in.
Did You Enjoy Making This Recipe? Please rate this recipe with ⭐⭐⭐⭐⭐ or leave a comment.
📖 Recipe Card
Print
Snowflake Cheese Bread
- Total Time: 1 hour
- Yield: Approximately 12 servings 1x
Description
Experience the ultimate comfort food with this Snowflake Cheese Bread, characterized by its light, fluffy texture and rich, cheesy flavor. Each piece of this pull-apart delight is filled with gooey melted cheese, making it an irresistible treat for cheese lovers. Perfect for any occasion—whether served warm as a snack, paired with soup, or enjoyed at gatherings—this recipe is simple enough for novice bakers yet impressive enough to wow seasoned chefs. With minimal ingredients and straightforward steps, you can create a loaf that not only pleases the palate but also fills your kitchen with an inviting aroma.
Ingredients
- 4 cups all-purpose flour
- 1 cup warm water (110°F / 43°C)
- 2 teaspoons active dry yeast
- 1 tablespoon sugar
- 1 teaspoon salt
- 2 cups shredded cheese (mozzarella or cheddar)
Instructions
- 1. In a mixing bowl, combine warm water and sugar. Sprinkle active dry yeast on top and let sit until foamy (5-10 minutes).
- 2. In another bowl, mix all-purpose flour and salt. Once the yeast mixture is foamy, add it to the flour mixture and stir until a rough dough forms.
- 3. Knead the dough on a floured surface for about 8-10 minutes until smooth. Place in an oiled bowl, cover with plastic wrap or a damp cloth, and let rise in a warm place until doubled in size (about an hour).
- 4. Punch down the risen dough and divide into small pieces. Flatten each piece slightly, add shredded cheese, and roll into balls.
- 5. Arrange the balls in a greased baking dish, cover again, and let them rise until puffed (another hour).
- 6. Preheat your oven to 375°F (190°C) and bake for approximately 25-30 minutes until golden brown.
- Prep Time: 30 minutes
- Cook Time: 30 minutes
- Category: Comfort Food
- Method: Baking
- Cuisine: American
Nutrition
- Serving Size: 1 serving
- Calories: 150
- Sugar: 1g
- Sodium: 180mg
- Fat: 7g
- Saturated Fat: 4g
- Unsaturated Fat: 2g
- Trans Fat: 0g
- Carbohydrates: 17g
- Fiber: 1g
- Protein: 6g
- Cholesterol: 20mg


